
Wi-Fi Hotspot Captive Portal Network
This lab will mimic a free Wi-Fi hotspot portal which can be regularly seen within many establishments these days. The lab consists of the following devices:
- Captive Portal Server (Untangle LTE Linux OS)
- Access Point (D-Link DWL-2100AP)
- Switch (TP-Link TL-SG1005D)
- Attack Machine (Kali Linux)
- Victim Machine 1 (Windows 7 Virtual Machine) [Optional]
- Victim Machine 2 (Nexus 7 tablet) [Optional]

Captive Portal Server Configuration
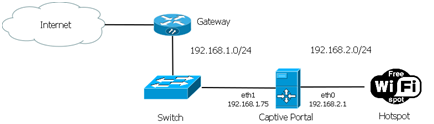
Untangle LTE Linux OS was installed to a spare computer, as well as the installation of a secondary network adapter. Once Untangle has been installed the server must be configured so that internet access can be granted once users authenticate. As shown within the Figure below, network adapter ‘eth1’ was connected via Ethernet to the internet gateway, whilst network adapter ‘eth0’ was connected via Ethernet to the Access Point (AP). This allows the users to connect via the AP (eth0), authenticate to the server and then be granted internet access via the gateway. The Captive Portal (CP) network has also been given a different Class C address range from the internal network.
Due to being out on the road whilst writing this lab setup, I was unable to take screen shots from the server, instead I have installed Untangle to a Virtual Machine (VM) so that screen shots could be provided. Untangle provides an easy to use configuration setup, once the installation process is complete and the system has rebooted you will be presented with the ‘Setup Wizard’.
Choose a Password and select your timezone.

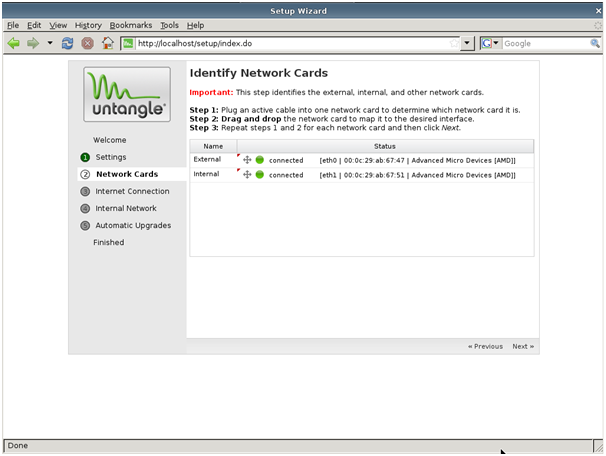
The next step is where the network adapters are associated to the gateway and AP, assign your adapters accordingly.
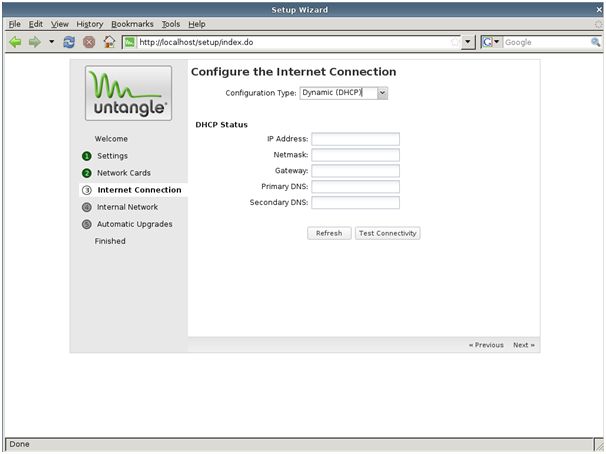
The internet connection is then configured within the window below,
Press ‘Test Connectivity’, if you have set the network adapters correctly these details will be auto-completed.
Choose the option which best suites your network, as shown within the image below I have chosen the ‘Router’ option.

Update Untangle and then the network configuration is completed, proceed to the OS.
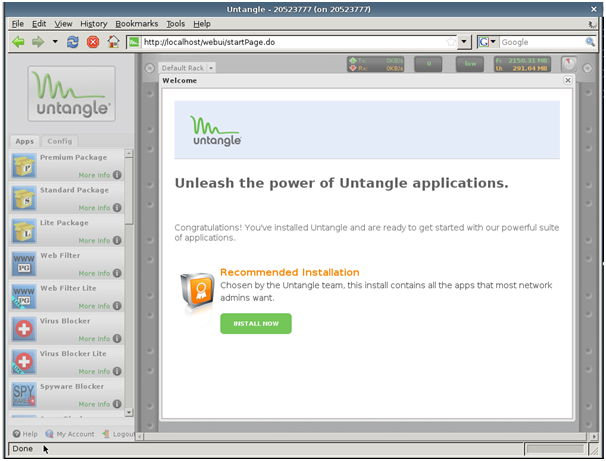
Once you have launched the client, you will be presented with the window below.
Click ‘Install Now’.
As a new user of Untangle you must now create an account. Don’t worry you will not have to make any payment, this allows you the option of paying for Untangle Apps if you wish. Prepaid apps will not be used within this lab.

Once an account has been created and you have logged in using the new details, Untangle will automatically download and install the default apps which can be seen within the image below.

Next switched off the trial applications, by clicking on the ‘power’ icon, these will not be needed for the lab.
The Captive Portal application must then be installed to the server. To do so click on the ‘Captive Portal’ icon within the left hand apps bar. You will then be taken to the Captive Portal installation screen, click ‘Download Free App’, the application will be downloaded and installed to the server.

Next click ‘Settings’ on the newly installed ‘Captive Portal application’. Navigate to the ‘Captive Rules’ tab as seen within the image below. Tick ‘Enable’ for ‘Capture all traffic on the internal interface’, click ‘Apply’.

Next navigate to the ‘Captive Page’ tab.

Here you can customise the Captive Portal page which is provided when users connect to your Wi-Fi hotspot. This customisation is purely up to the reader, as seen within the image below I made a custom CP page to make people aware that pen-testing would be occurring on the network and people connect to it at their own risk. Once your customisation has been completed click ‘Apply’.

Next click on the ‘User Authentication’ tab, this will enable the user authentication mechanism to be configured. Select ‘Local Directory’, this will use a local database on the server for user authentication details to be stored.
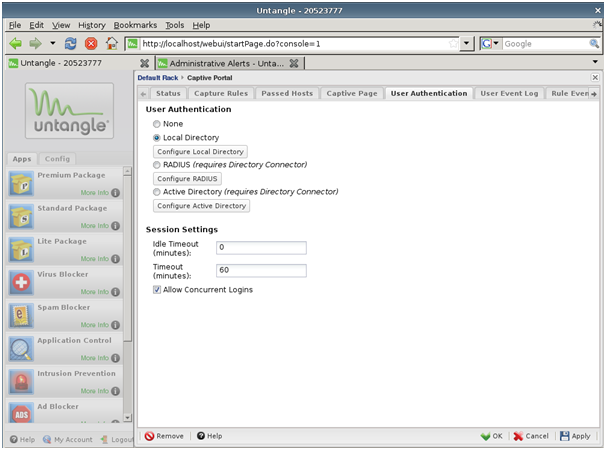
Click ‘Configure Local Directory’, then click ‘add’ as shown in the image below to create users of the network.

Assign user credential details for your new user. I have made two users, ‘Victim & Attacker’. Once complete click ‘Done’ and apply the changes within ‘User Authentication’.

Once completed finalise the new settings by clicking ‘Apply’ within the ‘Captive Portal’ application.
The CP server is now completed, ensure everything is running correctly by authenticating to the server with the newly made user credentials. If you have any errors and cannot connect to the server please leave a detailed message within this post and I will get back to you as quickly as possible.
Target Machines
The target machines used within the tutorials are Microsoft Windows 7 installed within a VM using an Alfa Wireless Adapter and Android Jelly Bean on the Nexus 7. Which target machines used within the testing is optional to the reader, but it is advised to use the same lab environment as myself for constituency. I will be using both Windows / Android to illustrate that exploitation can occur regardless of the target OS and that by using free Wi-Fi hotspots users leave themselves vulnerable to attack.
Windows
Browser: Firefox v
Android Jelly Bean
Browser: Firefox v
Outdated vulnerable applications have been chosen in order to demonstrate the procedures of client-side attacks, the exploit delivery procedure will never change but obviously exploits will differ depending on the applications which are being exploited.
Victim Accounts
Victim accounts have been setup to allow testing to occur, during the tutorials user credentials will be acquired due to this Amazon, Outlook and Facebook accounts were created. Obviously I do not want to use my personal accounts through the tutorials.
Attack Machine
Offensive Security Kali Linux will be used as the attack platform utilising an Alfa Wireless Adapter. Any pen-test OS can be used as long as the tools are available, it is the choice of the reader which Distro they prefer. It is advised that the pen-test machine is not installed within a VM and installed to a standalone computer, during testing it was found that certain attacks could not be initiated when running the attacks from a VM.
